

~Be Mine~
This tutorial is one I have created and any similarities
are purely coincidental.
If you have any problems please contact me at Polliwog707@aol.com
Id also love to see any results of the tut!
Supplies Needed:
Tube of choice. Im using one by Elias Chatzoudis and I cannot provide it.
You can find his work at www.mypsptubes.com
Scrapkit called Be_Mine can be found here http://staceysdesigns.blogspot.com/
Mask of choice.
Filter used Eyecandy 4 gradient glow.
(I used this on my name text) so its an option.
~~OKAY LETS GET STARTED~~
New image 600 x 600 floodfill white.
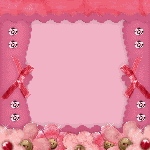
Copy and paste PinkStitchedHeart as new layer.
With magic wand click inside your heart, modify contract by 10.
Copy and paste paper2 as new layer. Selections invert then hit delete
on your keyboard. Drop shadow of choice.
Open Pinkbemine resize 40% and copy and paste as new layer.
Gradient glow black.
Open PinkFlower and resize 40% Copy and past as new layer.
Duplicate, mirror, duplicate and move to the middle *see my tag
for location*, duplicate once more and resize by 40% then move to
the left or right and duplicate one last time and mirror. Drop shadow
of choice as always. Close off all layers except the flowers and merge
visible. Open the other layers up again.
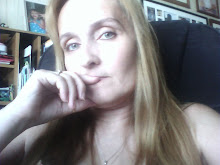
Add tube of choice and move under the flowers.
Open PinkHeartRibbon and resize by 70%. Copy and paste as new layer.
Rotate by 25 and with eraser tool get rid of as much as you do not want on there.
See my tag as a reference.
Click on bottom white layer and add paper2. Apply mask of choice.
Add your copyright info and watermarks now.
Resize and save.
This tutorial is one I have created and any similarities
are purely coincidental.
If you have any problems please contact me at Polliwog707@aol.com
Id also love to see any results of the tut!
Supplies Needed:
Tube of choice. Im using one by Elias Chatzoudis and I cannot provide it.
You can find his work at www.mypsptubes.com
Scrapkit called Be_Mine can be found here http://staceysdesigns.blogspot.com/
Mask of choice.
Filter used Eyecandy 4 gradient glow.
(I used this on my name text) so its an option.
~~OKAY LETS GET STARTED~~
New image 600 x 600 floodfill white.
Copy and paste PinkStitchedHeart as new layer.
With magic wand click inside your heart, modify contract by 10.
Copy and paste paper2 as new layer. Selections invert then hit delete
on your keyboard. Drop shadow of choice.
Open Pinkbemine resize 40% and copy and paste as new layer.
Gradient glow black.
Open PinkFlower and resize 40% Copy and past as new layer.
Duplicate, mirror, duplicate and move to the middle *see my tag
for location*, duplicate once more and resize by 40% then move to
the left or right and duplicate one last time and mirror. Drop shadow
of choice as always. Close off all layers except the flowers and merge
visible. Open the other layers up again.
Add tube of choice and move under the flowers.
Open PinkHeartRibbon and resize by 70%. Copy and paste as new layer.
Rotate by 25 and with eraser tool get rid of as much as you do not want on there.
See my tag as a reference.
Click on bottom white layer and add paper2. Apply mask of choice.
Add your copyright info and watermarks now.
Resize and save.

0 comments:
Post a Comment